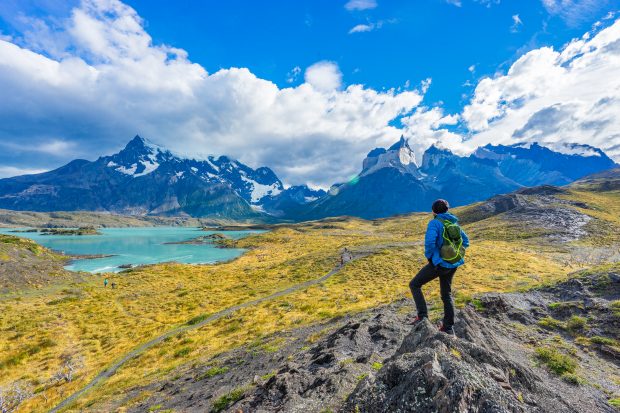
The Torres del Paine O Trek is the ultimate full circuit trek through Chile’s most famous national park. This route includes the well-known Torres del Paine W Trek but also takes you through the remote backside of the park, offering incredible views of glaciers and untouched landscapes. I've completed this trek twice and have compiled this detailed hiking guide to help you plan your own adventure.
In this article, I’ll explain the standard circuit route (8 days) in Torres del Paine National Park, followed by a shorter (7-day) and longer (9-day) itinerary of the trek.
1. Preparation & Map
The Torres del Paine O Trek is a moderately difficult circuit. However, crossing the John Garner Pass requires a good level of fitness, and having a head for heights can be beneficial afterward. To prepare for this trek in Patagonia, check out my detailed guide for hiking in Torres del Paine National Park. There, you’ll find everything about logistics, booking campsites and hotels, and general travel information. My recommendations for gear and equipment including backpack recommendations are listed in my Patagonia packing list.

The trek must be done counterclockwise, and you need to book all campgrounds in advance. Without campsite reservations, you won’t be allowed to start the trek. Campground bookings can be made online with private providers Las Torres and Vertice, and early reservations are highly recommended.
Before heading to the park, you should also book your Torres del Paine National Park entrance ticket online as for most of the parks in Patagonia. Be sure to book the correct ticket for a stay longer than three days:
- National park tickets via Pases Parques Nacionales
- O Circuit route with GPS navigation via AllTrails
I also highly recommend getting good travel insurance when planning hikes in Patagonia.
History of the O Circuit
The Torres del Paine O Trek was first mapped by three pioneers: British mountaineer John Garner and two park rangers, Pepe Alarcón and Oscar Guineo. In 1976, they explored this trail and laid the foundation for what is now one of the most spectacular treks in Patagonia.

2. Standard Route (8D)
The standard route is the most common way to complete the Torres del Paine O Circuit. The first few days are relatively easy, allowing you to gradually prepare for the more demanding climbs later in this Torres del Paine trek.
It’s always a good idea to carry an extra day’s worth of food for the full Torres del Paine circuit, as the John Garner Pass should not be crossed in bad weather. If necessary, you may need to stay an additional night at Campamento Los Perros. Camping is required on this trek since there aren’t enough refugios in this part of the park. A reliable tent and a comfortable backpack should definitely be part of your gear!
Day 1: Puerto Natales – Campamento Serón (12 km)
Take the morning bus from Puerto Natales to the park entrance. From here, follow the trail towards the river, cross it, and continue hiking until you see the turnoff to Campamento Serón on your right. If you want to save some distance, you can take the paid shuttle bus to Hotel Las Torres.
After a relatively easy hike through forests and meadows, you’ll arrive at Campamento Serón in the early afternoon. Take it easy on your first night, set up your tent, and enjoy the atmosphere. This is a great place to connect with fellow hikers who are also tackling the full Torres circuit.

Day 2: Campamento Serón – Refugio Dickson (18 km)
This stretch is longer than the previous day’s hike, but in this sector you can find the most scenic camp in the entire park (make sure to book well in advance!). Since the hike takes about five hours, you can take your time in the morning, pack your gear, and enjoy a solid breakfast.
The trail follows the river and then ascends over a small pass, where strong winds are common. If you started early, you should reach Lago Dickson in the afternoon. The campground is right by the lake, with a stunning view of the surrounding glaciers. Set up your tent and take in the incredible landscape.

Day 3: Refugio Dickson – Campamento Los Perros (11 km)
The scenery of this camp is incredible, right? Since today’s distance is relatively short, you can take your time in the morning and enjoy breakfast at a nearby viewpoint overlooking Lago Dickson and the valley ahead.
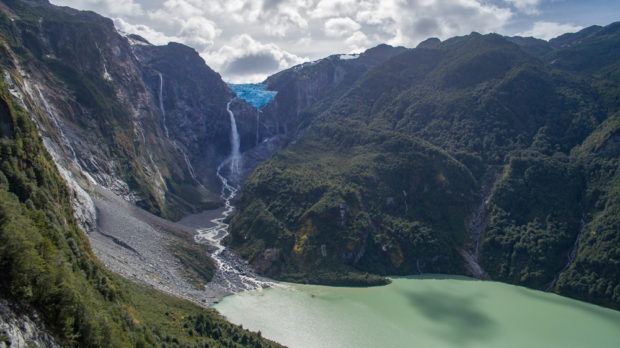
Start hiking by 11 a.m. The trail gradually ascends through a forest before reaching an incredible viewpoint over Lago Dickson. A bit further ahead, you’ll hear the roar of a waterfall before you even see it—a perfect spot for a short break.
Afterwards, continue through the forest, cross two streams, and start the rocky ascent toward the Mirador Glaciar Los Perros (formerly known as “Mirador Británico” regarding my old Patagonia Guide Book). This spot offers a stunning view of the Los Perros Glacier and its lake. Take it all in before making the final 10-15 minute hike to Camp Los Perros.
You should arrive around 3 or 4 p.m. at the campground. Get to bed early, as tomorrow will be the toughest day of the route. Set your alarm for 5 a.m.—the best weather conditions for crossing the pass are usually in the morning.

Day 4: Campamento Los Perros – Paso – Refugio Grey (15 km)
Ugh, 5 a.m.—it’s still dark and freezing. But now it’s time to leave your warm sleeping bag, have a quick breakfast, and mentally prepare for the challenging pass crossing ahead. Pack up your tent and gear (at this point, you’re getting pretty good at it) and set off. The trail climbs steadily for 2–3 hours.
After exiting the forest, you’ll reach open terrain with loose rock and scree. Pay extra attention to the weather: only proceed if you can clearly see the orange or red markers along the trail. If visibility is too low, it’s best to turn back, as conditions will be even harsher further up in this sector of the park.

If the weather is on your side, you’re in for an incredible but tough stretch. The climb is steep and extremely windy, especially at the highest point of John Garner Pass. Winds can be so strong here that crawling may be necessary. There’s a small windbreak on the left where you can take a quick breather.
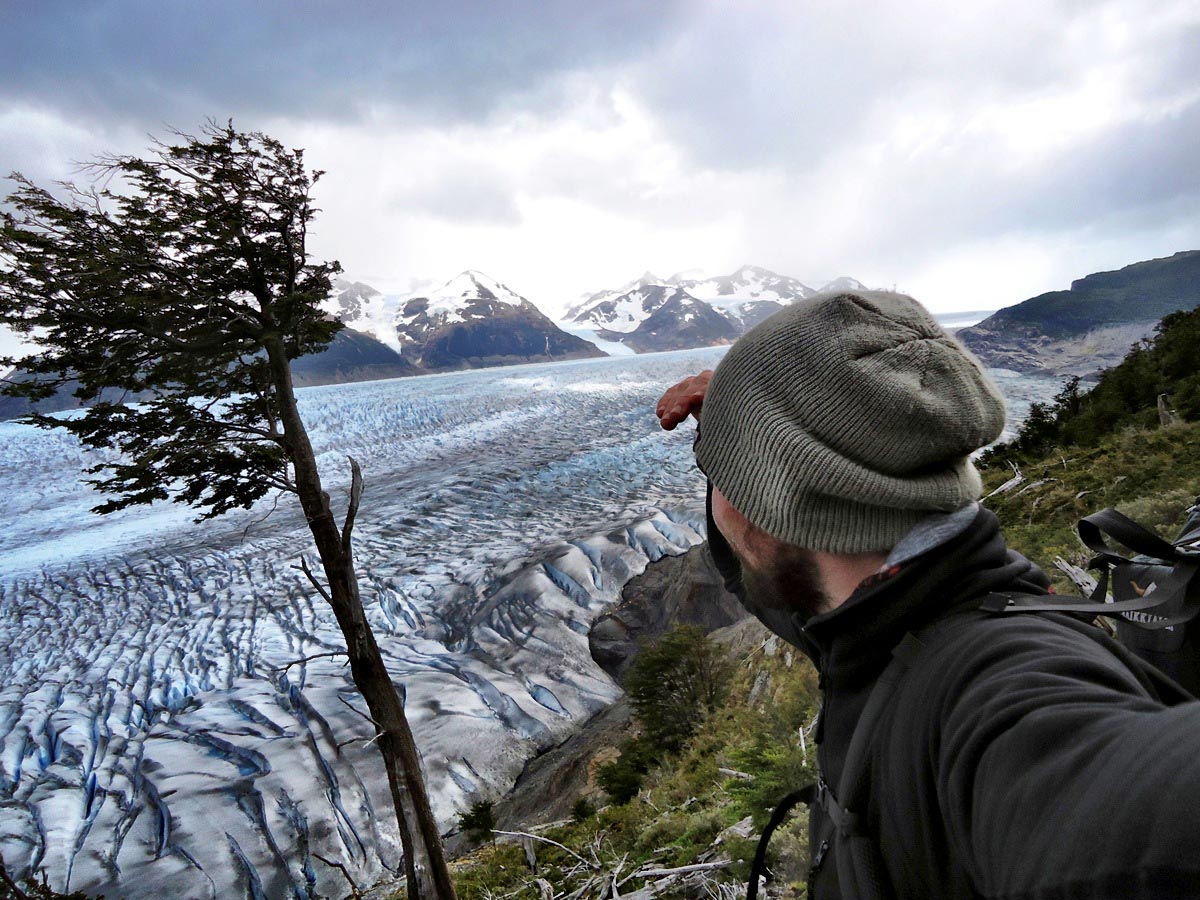
Once at the top, you’ll be rewarded with a mind-blowing view: the immense Southern Patagonian Ice Field stretches as far as the eye can see. Take a moment to soak it all in, grab some water, and snap some photos.

The descent from the pass is steep, leading to the Paso Ranger Station, which you should reach by late morning (around 11 or 12). Take a break here and enjoy the nearby viewpoints.
From the station, it’s another five hours to Refugio Grey. This sector is one of the trek’s highlights, as the trail runs along a dramatic cliffside with insane views of Grey Glacier. The final stretch takes you down ladders and across suspension bridges.
A few hours before reaching your destination, you’ll pass an old abandoned camp (marked “no camping”). Just beyond this area, there’s another fantastic viewpoint, marked as a red trail on AllTrails.
By late afternoon, you’ll finally arrive at the campground & Refugio Grey. You’ve earned a break. Grab some food and get some rest, because after a day like this, sleep will come easy!

Day 5: Refugio Grey – Paine Grande (11 km)
Wow! You've made it to day five in the park and have already had some incredible experiences, right?
There’s still more to come—take it easy in the morning and enjoy breakfast. Before heading out, I recommend a short detour to Mirador Grey for an amazing view of the glacier. Then, return to the campground, pack your gear, and start your next section around midday.
The hike to Paine Grande takes around 3–4 hours. Once you arrive, find a tent spot near the small hill to get some protection from the strong winds.

Day 6: Paine Grande – Valle del Francés – Los Cuernos (22.5 km)
Today will be a long and demanding hike, so get an early start and hit the trail by 8:00 AM. The first section leads to the Italiano ranger station (about 2 hours).
Once there (around 10:00 AM), you can leave your backpack behind and take only water, snacks, and sunscreen for the climb to Mirador Británico. The hike takes another 2.5–3 hours, and at the top, you're rewarded with spectacular views of surrounding mountains and glaciers.
Take a well-deserved break for lunch while enjoying the breathtaking scenery. Afterwards, descend back to the ranger station, grab your backpack (around 3:00–3:30 PM), and continue towards Refugio Los Cuernos. This section takes about 2 hours and follows the trail right next to the impressive Los Cuernos mountain range. You should reach Refugio and Camp Los Cuernos by 5:00–5:30 PM.

Day 7: Los Cuernos – Refugio Chileno (20 km)
Your last full day is an easier one. The route starts fairly flat and easy but gradually becomes steeper as you approach Campamento Chileno in the most popular sector of the park.
Pack your backpack and leave Refugio Los Cuernos around 10:00 AM, follow the trail towards Refugio Chileno. The route follows Lago Nordernskjöld, offering beautiful views of the surrounding landscape. After about 3.5 hours, you'll reach a junction marked “Shortcut to Chileno.” Take this shortcut (turn left).
After another 2 hours, you'll arrive at Refugio Chileno (around 3:30–4:00 PM) and can set up your tent for the night. Get some rest and head to bed before night fall. Tomorrow morning, you'll be hiking up to the Torres for sunrise. Set your alarm for 2–2.5 hours before sunrise and pack a small backpack with a sleeping pad, sleeping bag, warm jacket, and breakfast.

Day 8: Chileno – Torres – Puerto Natales (10-15 km)
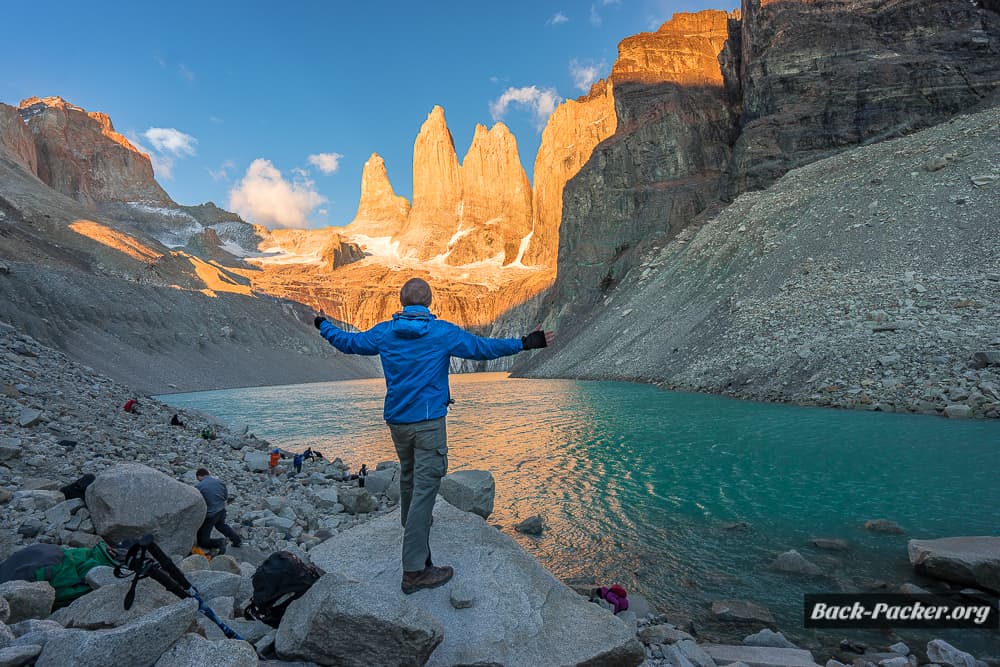
Start your final day early to reach the Torres viewpoint by sunrise. You can leave everything inside your tent at camp and only take a small backpack with the previously mentioned essentials. The trail begins with an ascent to the Torres ranger station, which takes about an hour. From there, it’s another steep one-hour climb to the lagoon at the base of the towers.
At the top, soak in the incredible view—this is what you've worked so hard for! Find a spot, have your breakfast, and enjoy the moment. If you're lucky, you’ll see the first rays of sunlight illuminate the Torres in brilliant shades of orange and red. Even if it’s cloudy, don’t be discouraged—the weather changes fast. Be prepared for all conditions by packing rain gear.
After breakfast, descend back to Camp Chileno, pack up, and hike down to Hotel Las Torres (about 2 hours) to travel back to Puerto Natales.
Once at the hotel, you have two options to get back to Puerto Natales:
– Hike the final 7.5 km (about an hour) along the road to the park entrance (Laguna Amarga). Where the Buses to Puerto Natales leave.
– Take the shuttle for about €3–4, which drops you at the entrance.
Congratulations!
You’ve completed the Torres del Paine Circuit—a total of 125–130 km! An unforgettable adventure in Patagonia. Make sure to treat yourself to a celebratory meal in one of the many good restaurants in Puerto Natales before you travel to the next destination.

3. Short Version (7D)
Are you in great shape, have hiking experience in Patagonia, and are short on time? The Torres del Paine Circuit can be done in seven days if you’re up for the challenge. Again you need to book all campsites way in advance to be allowed to start hiking and you need to plan with the trail closure times in mind.
Day 1: Puerto Natales – Campamento Serón (12 km)
Take an early bus from Puerto Natales and follow the same itinerary as the standard route.
Day 2: Campamento Serón – Refugio Dickson – Campamento Los Perros (29 km)
Today and tomorrow are the most demanding days of the trek. Eat a solid breakfast and start hiking by 7 a.m. to reach Refugio Dickson around midday.
The trail follows the river and ascends a small pass where strong winds are common. By lunchtime, you should arrive at Lago Dickson, where the campsite sits by the lake with a stunning view of the surrounding glaciers.
Pretty amazing, right?
But there are still 9 km to go! Have lunch and start hiking again around 1 p.m. The trail climbs through the forest, offering breathtaking views over the valley and Lago Dickson. You’ll soon reach a roaring waterfall, a great place to take a short break.
Continue through the forest, cross two rivers, and start the steep, rocky ascent. Eventually, you’ll reach the Mirador Glaciar Los Perros, a perfect spot to admire the glacier and lake.
After a final 10–15 minute hike, you’ll arrive at Campamento Los Perros. Try to get to bed early, as tomorrow is the hardest section of the circuit. Set your alarm for 5 a.m.—early starts give you the best chance for clear weather at the pass.

Day 3: Campamento Los Perros – Paso – Refugio Grey (22 km)
5 a.m. – still dark and freezing. Time to get out of your sleeping bag, have a quick breakfast, and mentally prepare for the pass crossing. Pack your tent and start hiking by 6 a.m.—this is going to be a long day.
After leaving the forest, you’ll find yourself in a landscape of loose rock and scree. Only proceed if you can clearly see the red or orange trail markers—if visibility is poor, it’s best to turn back, as conditions will be even harsher higher up.
If everything looks good, you’re in for an incredible but challenging climb. The ascent to John Garner Pass is steep, and the winds at the top can be brutal. Sometimes, crawling is the only way forward. There’s a small wind shelter on the left—take a break there if needed.
At the pass, you’ll be rewarded with an unforgettable view of the Southern Patagonian Ice Field. This is one of the highlights of the entire trek. Take a deep breath, snap some photos, and enjoy the moment.

After crossing the pass, you reach the old Campamento Paso (arriving around 11 or 12). This is a great place to rest and take in the viewpoints before continuing.
From here, it took me about five more hours to Refugio Grey. This stretch is arguably one of the most scenic parts of the circuit, as you follow a high trail along the cliffs, offering dramatic views of Grey Glacier. The descent includes ladders, bridges, and some tricky sections.
Around three to four hours before reaching Refugio Grey, you’ll pass an old campground marked “no camping.” Shortly after this, you’ll find a viewpoint marked as a red trail on AllTrails.
By around 5 p.m., you should arrive at Refugio Grey—finally, some time to rest! Grab some food, relax, and enjoy a well-earned night’s sleep.
Day 4: Refugio Grey – Paine Grande (11 km)
After two intense days, today is much easier. Sleep in a little, enjoy breakfast, and take some time to visit the Mirador Grey for another stunning view of the glacier.
Leave the camp around 11 a.m. The hike to Paine Grande takes about three to four hours. Once you arrive, pick a sheltered spot for your tent, as the winds here can be strong.
Continue from here with Day 6 of the standard route!

4. Long Version (9D)
If you want to take it slower and really enjoy the landscape, this extended version of the Torres del Paine Circuit is for you. The park is spectacular, so why rush it? This itinerary splits up Day 6 of the standard route, giving you more time to soak in the scenery and adjust the stopping points slightly. Follow the standard itinerary up to Day 5, then continue here:
Day 6: Paine Grande – Valle del Francés – Campamento Francés (20 km)
Start your hike at 8 a.m. and head towards the Ranger Station Italiano, which takes about two hours. Once there, leave your heavy gear behind and set off towards Mirador Británico with just a light daypack.
After another 2.5 hours, you’ll reach the viewpoint. It’s the perfect spot for a lunch break with an epic backdrop of the surrounding peaks and glaciers.
After lunch (around 12:30 p.m.), descend back to the ranger station, grab your gear, and hike another 2 km to Campamento Francés, where you’ll spend the night.

Day 7: Campamento Francés – Hotel Las Torres / Camp Central (15 km)
Take it easy this morning: you don’t need to start hiking until 10 a.m.
The trail follows the shore of Lago Nordenskjöld, offering stunning views along the way. After about five hours, you’ll reach a junction marked “shortcut to Chileno” — ignore this and stay on the main route towards Hotel Las Torres and Camp Central.
You should arrive at Hotel Las Torres around 4 p.m. The adjacent Camp Central is where you’ll set up for the night.

Day 8: Hotel Las Torres – Campamento Chileno (5 km or optional 14 km)
This is one of the most relaxed days of the trek. You only need to hike two hours uphill to reach Campamento Chileno, so take your time in the morning and aim to arrive around midday.
Once at Chileno, you have two choices: either hike up to the Torres viewpoint in the afternoon or save it for sunrise the next morning.
Continue with Day 9 from the standard route!

5. My Experience
I first hiked the full Torres del Paine Circuit in 2013, back when no reservations were required. In 2016, I returned to Puerto Natales to complete the route again, but this time, the number of visitors had significantly increased. All the time estimates I’ve provided are based on my personal experience. I tend to hike slightly faster than average, but I take plenty of breaks for filming and photography.
In my Patagonia documentary, I’ve documented my hikes in Torres del Paine National Park in detail. I also feature day hikes and tours starting in Puerto Natales:
On my latest visit to Puerto Natales during the 2024/25 season, booking individual campsites for the circuit had become nearly impossible. Instead, I opted for day hikes in Torres del Paine National Park. If you still want to complete the full circuit trek despite fully booked camps, your only remaining option is to book a guided tour, which I explain in the following segment.
6. Tour Options
If you want to experience the full beauty of the Torres del Paine Circuit without the hassle of organizing every detail yourself, you should definitely book a guided tour. Planning an independent trek means securing campsite reservations months in advance, arranging transport, and carrying all your gear—including food—for over a week. With limited availability and high demand, this can be a challenge.
A guided trek takes care of everything: permits, meals, transport, and even camping gear. You'll be accompanied by experienced guides who know the terrain inside out, making this travel and hiking experience not only easier but also safer. Plus, you won’t have to carry as much weight since porters handle the bulk of the load.
For those who want to focus on the adventure rather than logistics, I highly recommend the O Circuit with G Adventures. This 11-day trek covers the full route and includes meals, an expert guide, pre-arranged campsites, tents or hotel stays, transport, and porters.
Find out more about the O Circuit Tour with G Adventures here.
Have You Hiked the Torres del Paine O Circuit?
How was your travel and hiking experience? Do you have any travel tips or recommendations for readers that are headed to Puerto Natales? Feel free to share them with me on Instagram!
Note: This Torres del Paine National Park trekking guide contains affiliate links. These are only for services I personally use when I travel and can therefore recommend. If you book through them it won't cost you anything extra but helps support this blog. As always, all opinions, travel recommendations, and occasional sarcasm are my own.